Tuesday, October 25, 2016

What Not to Wear For the Great Apocalypse

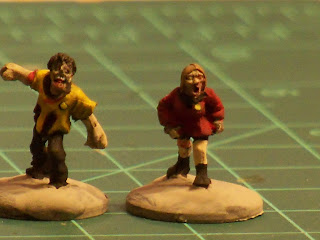
What would be one of the worse ways to be taken out from this life, during the Zombie Apocalypse other then being taken down by a Zombie, would to be taken down by Star Trek Convention Attendee Zombies!


Okay so looking through a group of zombie figures that I have, I believe they are from Khurasan Miniatures and when I saw these four figures then it hit me Trekkie Zombies! Dressed in the style of the Original Series.

Why not!? Imagine a Star Trek Convention somewhere near you when the big out break comes and later on you are cornered on the street or a room and the zombies are all Trekkies!

Gotta have a Red Shirt!

A Captain James T. Kirk want a be torn shirt as well!

I can't leave the women out either

This one has clear coat on waiting for a matte finish.

So yeah my players could be taken out by Trekkie Zombies, and let face it funny and would just add more fun to the game, so anytime the game system throws in four zombies as on plays on you can bet these will be the four I'll throw into the game.

I was hoping to find a survivor in the right kind of shirt but no luck, the plan would have been to paint all the others in the blue and yellow shirts and he would have been the sole survivor in a red shirt!

On to the Next!

Hawaiian Shirt!? Yeah I got a guy in Hawaiian Shirts who was coming from or going to a Frat Party or Office Party where a Hawaiian Luau is the theme.


Oh yeah you can see him from a mile.
I have other color schemes if I find any others that have a right shirt.

They all need a few final touches but all of them are off to a great start, I have others that will be coming just wearing the wrong clothes on the wrong day. So keep checking in from time to time.

Saturday, September 24, 2016

State Troopers

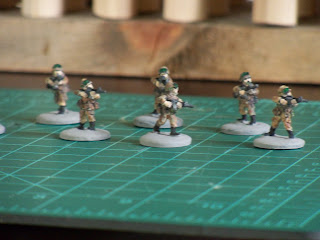
So I did the head swap earlier and finally got around to priming them and now I have them painted.

The paint scheme for them is based off of Minnesota State Troopers I think the came out really good myself and so here they are.


Little closer view.


They are going to be great on the table.

Thanks for looking.


Tuesday, September 20, 2016

More Painted Figures

Okay so remember I haven't paint in many many years, and I just wanted to post these to see what many of you think.

So I my large scale Zombie game these are the troops that will bring the fight to the Zombies


My game plan is to use a military unit as a survival group and follow their story as it unfolds using the "All Things Zombie" rules from "Two Hour Games"


Now it's just a handful that I painted up to figure a couple of things paint scheme and techniques "OH MAN AM I RUSTY!" at this but it's all coming back to me slowly.


They look much better in person still need to work on my wash technique haven't been able to find my inks which would help, still have some boxes that we still haven't unpacked yet.

Nice thing is I can use these guys for other games as well.

Thank You for looking.  

Monday, September 12, 2016

Painting Figures

Painting Figures is a skill.

Now I know I haven't painted figure for some years now, oh wait some 34 years to be a matter of fact, but I want to share what I do know and you will be able to see my work as we go along. Much like any skill if you don"t use it you loss it.

First off I washed my figures with a mild detergent to remove any and all mold releasing agents, this is a must there is no getting around it if you want your paints to stick to the figure. Once done let dry.

Next I primed my figure with a Primer paint, what Primer you use is up to you, there is a lot of debate as to which one to use. I use the cheap off the shelf stuff at most any hardware place Rustoleum Primer. One could use the more expensive one from you local hobby shop for painting figures.

Now I mount my figure on something that will become a handle which make handling them easier as I paint and I don't have to directly handle the figures with my fingers, now you can use wine bottle corks or wood dowels, I use wood dowels mount the figures with blue poster putty.

I made a stand for the wood dowels out of a section of 1"x 4" then bored hole in it it sore of looks like a test tube holder. The wood dowels I cut down to 4 1/2 inches to hold comfortable in my hand as I paint.


Now I have always painted my figures as I would dress myself, starting with any and all skin areas, then hair, working with the 15mm range you don't really need to paint the eyes, a simple very thin black lines will do reasonable well (--) being is in daylight we squint our eyes and therefor you don't really see the color or the details of ones eyes at a long distance.

Paint the skin in a deep skin tone then use a lighter tone for the high areas of the face and hands then use a lighter tone for the high lights for the face and hands bridge of the nose, chin, cheek bones.

Same approach for the hair as well.

Next we pant the cloth areas starting with the inner clothes if the figure is wearing a tee shirt and jacket you start with the tee shirt then the jacket and so forth with the pants or skirts.

Shoes and boots are last.

Now for the details weapons or any other hand held objects.

Last is the finer details, those little things you want to pick out on your figure buckles, buttons, and any other details you wish to high light for this I like to use toothpicks soaking in water.


Working with toothpicks
I can sharpen them to a sharper point as I wish to have, using my hobby knife. Soaking the tooth pick in water as you work prevents the paint from soaking into the wood before you have a chance to put it to the figure, second the water in the toothpick helps keep the paint wet just long enough until you put it to the figure, you may have to apply the paint more then once, but the results are worth the effort.

Next step is to do a wash of the figure, this can be a paint wash or an ink wash.

The last step is to seal your work, this can be done with Future Floor Wax (Not really a wax) a clear varnish or other sealers from gaming stores,. A sealing oat helps save your great paint job, protects the paint from oily fingers or from chipping of as well. I'm using a water base polyurethane it's water thin and it dries as a very thin hard shell I have to do a few coats. Once they are dry to knock down the shine you will have use a can of dull coat from most any brand. Again I'm using cheap off the shelf stuff from the hardware store.

So here is a set of my figures so what do you think.


I started with zombies again I haven't done this in over some time so if I screwed them up, who cares there Zombies, now this set still needs to be sealed and matted but I think the came out pretty good.


in the photo above you can see my basing technique with the wood glue and the paint finish, you find your eye looking at the figures and not the ground effects drawing your eye away from the figures.

Now I know this is my first batch and with practice I will get better, like I said that's why I'm doing my zombies first.

I do need to get some more shades of paint, but hey I paint these guys with craft paint that I picked up some time ago and posted that find on here.


Thursday, September 8, 2016

State Troopers

Just a quick update;
So I did a head swap with six Rebel Minis's Police figures to have six State
Troopers, which would be enough for a really good road block on a highway setting or back up for Sheriff Department.


So here are the six figures, ready now for primer and paint.


When your turning around the bend and your headlights hit their road block. Oh I'm sooo Busted


So I hope one can see how a simple head swap can change a whole figure and give you other options, So now my duplicate figures now have added value, I have Police, State Troopers and my next post will have Sheriff Deputies.

Tuesday, August 16, 2016

Talking Heads

Okay so it's not the group from way back when.

But I'm talking about head swaps.

So I bought a set of Police Officers from Rebel Minis  http://www.rebelminis.com/index.html some time ago, which is great if you want a lot of just plain police officers but, NOoo not me I want a mix of law enforcement officers, other then just city types of police, I wanted a sheriff and some deputies and most of all some State Police or State Troopers as well,  I just don't want to fight off zombies in the city but options of doing so in a country setting as well, so after a long hunt I found some heads to swap out with.

Rebel Minis Police.

Peter Pig http://www.peterpig.co.uk/ has a whole section of mostly just heads, under "Heads and Odds", I ordered a few different sets, I bought a set of WWI Dough Boy with the campaign hats which will make up my state police. I also bought a set of ACW confederate wide brim hats, a little rework to the hats and they will make up for my sheriff and deputies.

WWI Dough Boys


First I have to remove the head off the figure that will be converted, I carefully removed the head, I scored along the neck with razor knife or Hobby knife then I use a large nail clipper to finish the job the score marks along the collar gave a place the the clippers cutting edges to rest in to make the cut.

Once the head is removed next I drilled a hole to receive the post of the new head,
I dry fit the new head to make sure it will fit, once I was happy with the new look I glued it in place, using Super Glue Gel.

And now I have a State Trooper.


Heck I could paint a couple as Game Wardens or Park Rangers as well.


Here is a look of both my Police Officer and State trooper side by side the head looks a little small in the side by side but I'm sure once the are all painted on the table on wouldn't notice that much of a change.


So I have a few more to go and paint job to boot then I will work on my Deputy Sheriff.

I have some cars that will get a State Trooper car paint job as well.

I hope this will help with giving one ideas to add to their games.

Thursday, July 28, 2016

Basing Mass Figures.

Okay so I have a lot of figures that need their bases finished, in a earlier post I showed you how I like to use Milliputty for some of my figures and that process takes time.

So how do you do it fast and get more figures done, I use wood glue around the base.

 The only tool you will need would be a handful of toothpicks.

Now this is going to take a couple of applications but I think the look is great.

Like I have explained in an earlier post on my thoughts on basing figures, that I don't  like flocking or clumps of grass all around my figures feet for most part in my game play is mostly around urban build up areas or cave and dungeons, but hay  to each  their  own .

I like mounting my figures on 1/4 inch washers the size to me looks right for the figures, sure it cost more but again it just looks right to me.


So now here is the figure after the first application of good old Elmers wood glue after it had dried.


And here is the second application after it had dried as well.


Okay so here is a side by side comparison of each stage. You cans see it builds up nicely to like a Pitcher's mound. You can also see that I had a gap problem with the trailing foot on all three of these figures  and the glue filled in the gap.


Here is a comparison shot of the wood glue base along with the Milliputty base. You can see a much cleaner looking base using the wood glue.


I am able to apply a single application to about 70 figures in an hour. Which is far better use of one's time the wood glue method is far faster and cost far less as well then the Milliputty and I think it make the figures look great. I let each application set over night before adding the next and let the next application set as well over night, now they are ready for painting.

Well I hope this helps one to choose the right look for their figure and that basing large amount of figures don't seem such a large task


Wednesday, April 13, 2016

Engineering Clutter

Here again playing in the plumbing department some of the same part used in my earlier post for engines can also be used for storage tanks for on your ship as well.

Okay so these are 1/2 inch, 3/4 inch, 1 inch  and a couple of 2 inch plumbing parts, these are all threaded parts that have the raise ridges of a better look.

One could also use them for other areas. Dress them up with some wire as piping and plumbing, some small panels here and there and I think they would look great.

Here I'm using them with the engines for a large looking engine room.

Engineering Room.
Now the parts in the upper right corner can also be used and a small engine as well for a small shuttle or something and seen below.


Now there are some other items added for more clutter.

The blue thing is a wall anchor.

Cap from a toothpaste style chalking tube.

House hold electrical connector.

Cat 5 electrical connector as a computer. 

A whole bank of computers.
You can get a pack of 25 for about $10


Here is just shot from different angles of would be engineering room.


I hope this has given you lots of ideas. Many of these items can be used for other terrain ideas as scattered items at a spaceport, crash site or other parts of your ship.

When these things are all dressed up with wire and plastic card for panels and other bits and bobs they are going to look great when all painted.

I know I have enjoyed sharing these ideas.

Friday, April 1, 2016

Scotty! I need more Power!

Aye Captain, I'm givin ya all the power she's got! Okay so I was tinkering around in the plumbing department at My local hardware store,when I came across all of these plumbing parts.

1 inch PVC parts.

1/2 inch PVC parts.


I then noticed if they were laid out in a certain combination of  parts they look like Spaceship engines. then it came to me that these would be great for the engines.

These I think would work great for smaller ships.

1/2 inch PVC Parts with 1 steel pipe nipple.

1/2 inch PVC Parts with 1 steel pipe nipple.

Now for some of the larger parts I had to use a cut off section of  1 inch PVC pipe in order to connect them together.


These I thought would work for a larger ship. You can make two versions using all the same parts just in a different order.

Version 1 using 1 inch PVC parts.

Version 2 using 1 inch PVC parts.


Together I think they all would work for added debris around spaceports as scrap metal or as cargo waiting for transportation.


My idea of a larger engine room. Or just scattered remains of a crashed ship of sorts.

So I will need to add bobs and bits to dress them up but over all I really think they will turn out great.

So I hope this will help all you Sci-fi gamers and I think that they would do well with 28 mm miniatures as well