Friday, May 15, 2020

Spaceship Crash Site

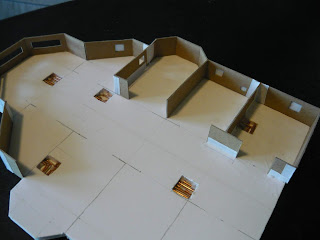
New project is a Derelict Space Craft, using three separate section pieces, I could then place them altogether as one drifting in space or have them spread out, making them three different section of a crash site where I can spread them across the terrain to investigate.

So I have started with the bridge and crew section there is the bridge it's self then two airlock sections followed by the crew's bunk section. I wanted to make it look like a derelict, I figured that I would need some missing panels.


Thus exposing the interior of the panel so I needed some thing for inside the open panels, with a piece of housing wire, using the copper wire and small bits of the insulation I know I could some nice looking piping and alike.


So this is a start, I need to make a cargo section, and an engine section as well. I also need to make some special terrain pieces that would support each section for a crash site. I can't wait to get these on the gaming table.

Saturday, May 9, 2020

Making a Small Terrain Board Part 2


The glue is dry so now I can trim the edges, seems the board in not quite 24 inches by 24 inches. I will have to compensate for that as I make the other boards for this set.


I like to use a very fine sand for my projects. The sand that I use is a pool filtering sand, it come in a large bag weighing about 35 pounds, I keep in a cat litter bucket out in the garage with the lid I don't want the cats to get any ideas.


I start spreading the glue out and add the sand with a tablespoon generously to insure that I get plenty of sand into everywhere I want it, using the back of the spoon to push the sand into the corners and tapping the sand down as well. 


I let it dry for a bit of time so the glue is still tack enough to hold the sand.


Then I dump the sand back into the bucket, then turn it over and tap and bang the back to insure to knock off any additional loose sand.


I will let it dry for a day of so, then I will use a small brush to knock any additional loose sand away, before I start painting on this project.

I want to make three different set of 8 boards, a desert set, green set for forest, jungles or just grass lands and then a city or urban set.

Now where did I leave that can of Black Primer??
 

Wednesday, May 6, 2020

Making a Small Terrain Board Part 1

Alright! I have had all this material around for make a small terrain board of 2 foot by 2 foot. Working on  the concept that I have been working and planning on https://silo1313.blogspot.com/2018/08/modular-city-boards-and-more.html .

I wanted something with some open terrain so that I can add terrain features that I have made https://silo1313.blogspot.com/2017/09/new-piece-added-to-my-terrain.html .

I had a 2 foot by 2 foot pink foam board actually a few of them but I'm going to work with this one for now I also had a pack of 4, 12 inch by 12 inch cork tile I have a few more of those around as well. I plan on making more boards later.

First I laid out the board to what I wanted it to look like, I wanted a small dried river bed with a little trickle of water rolling though it.

Once I had it all figured out I started to carve a little of the river bed out a little at a time till I had what I wanted, then I sand the bed some to give it a smoother surface.

Next I laid out the cork tile to get the shape that they well be then glued them down and pressed it all down with books and weights.

Here is the board as of now.


Here is a few pictures so far with some of my cardboard terrain.


Thanks for looking in, I have more to follow, so keep an Eye out for them. I'm working to have a 4 foot by 4 foot table of these. Ideally I would like to have a 4 foot by 8 foot table but for now this will work.