Showing posts with label My Terrain. Show all posts

Saturday, July 18, 2020

More Cardboard Terrain

My Cardboard Terrain is growing large now!

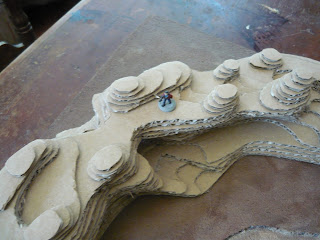
Needing some additional terrain to go along with the cardboard terrain that I have previously made. https://silo1313.blogspot.com/2017/09/my-terrain-continues.html  I needed some smaller ones to fill in areas to help limit access.


Still using all the same building construction technics as I have before. Layering as I go. 

I did make a couple of larger pieces.


This one is of the start of an inside of a volcano I am still working on this one I don't know just how big it's going to be. There is going to be a lave fall plus a couple of pools of lava as well. You can see in the pictures that there is three entrances into the mouth of this volcano giving to a lot options as to how a game can play out.


This piece will work great for my other games as well Fantasy, Pulp, and Pirates!

They all still need to be covered and and finished they are shaping up very well I really like the idea of just being able to place a few pieces on the table and go. Now I will have more options plus a few more ideas have come to mind, that I can't wait to get started on as well.

Saturday, May 9, 2020

Making a Small Terrain Board Part 2


The glue is dry so now I can trim the edges, seems the board in not quite 24 inches by 24 inches. I will have to compensate for that as I make the other boards for this set.


I like to use a very fine sand for my projects. The sand that I use is a pool filtering sand, it come in a large bag weighing about 35 pounds, I keep in a cat litter bucket out in the garage with the lid I don't want the cats to get any ideas.


I start spreading the glue out and add the sand with a tablespoon generously to insure that I get plenty of sand into everywhere I want it, using the back of the spoon to push the sand into the corners and tapping the sand down as well. 


I let it dry for a bit of time so the glue is still tack enough to hold the sand.


Then I dump the sand back into the bucket, then turn it over and tap and bang the back to insure to knock off any additional loose sand.


I will let it dry for a day of so, then I will use a small brush to knock any additional loose sand away, before I start painting on this project.

I want to make three different set of 8 boards, a desert set, green set for forest, jungles or just grass lands and then a city or urban set.

Now where did I leave that can of Black Primer??
 

Wednesday, May 6, 2020

Making a Small Terrain Board Part 1

Alright! I have had all this material around for make a small terrain board of 2 foot by 2 foot. Working on  the concept that I have been working and planning on https://silo1313.blogspot.com/2018/08/modular-city-boards-and-more.html .

I wanted something with some open terrain so that I can add terrain features that I have made https://silo1313.blogspot.com/2017/09/new-piece-added-to-my-terrain.html .

I had a 2 foot by 2 foot pink foam board actually a few of them but I'm going to work with this one for now I also had a pack of 4, 12 inch by 12 inch cork tile I have a few more of those around as well. I plan on making more boards later.

First I laid out the board to what I wanted it to look like, I wanted a small dried river bed with a little trickle of water rolling though it.

Once I had it all figured out I started to carve a little of the river bed out a little at a time till I had what I wanted, then I sand the bed some to give it a smoother surface.

Next I laid out the cork tile to get the shape that they well be then glued them down and pressed it all down with books and weights.

Here is the board as of now.


Here is a few pictures so far with some of my cardboard terrain.


Thanks for looking in, I have more to follow, so keep an Eye out for them. I'm working to have a 4 foot by 4 foot table of these. Ideally I would like to have a 4 foot by 8 foot table but for now this will work.

Wednesday, September 20, 2017

New Piece Added to "My Terrain"

Okay so a new experiment using Elmer's Clear School Glue for water effects, Okay I saw what someone had done on Google Plus, so I figured I'll give it a whirl, turns out this stuff really works for small projects or small areas, so you don't have to worry about mixing resins and figuring out how much to use or how much your going to end up wasting. So just go slow applying to reduce the amount of air bubbles.


Here you can see my lovely assistant's (aka Wife's) handy work after applying the Clear Glue in a velvety smooth finish. The glue is about an eighth of an inch thick (roughly 3mm)


Apply it like you would any other resin any small areas you may have to brush on and small bubbles you will have to herd them to the edge and work them up and out, you can't just pop them with a toothpick or a pin they just will not do that, no matter how much coaching or cursing you do.

The next few photos are of the new "My Terrain" piece.


So here is the "Volcanic Steam Vents with Bubbling Mud Pool" okay so the mud pool isn't so bubbly, but it sure look totally HOT!


All three pieces on a section of packing paper to give it the desert sand look.


Here so you can see scale wise, Three figures in the middle


So these three guys look so out of place here


And here.


The best thing is these pieces look so darn great on the table now and I have more to come!


Okay again these are looking really great and yes I have more planned, the best of this so far is finding the Clear Glue! for the water effects, now my Lovely Assistant wants me to build Jungle terrain with more water effect. So like any good Husband who in charge of the household and gaming I told her "Yes, Dear." Why not I have the Best of both world a great wife who encourages me to build gaming terrain

Sunday, September 3, 2017

"My Terrain" Continues

"My Terrain" Project continues forward, as I work on "The Cave" piece.

Now I'm going to apologize in advance for some of the photos I just couldn't keep my hands still enough for some of them.

Okay so here at the beginning, cutting, gluing and stacking cardboard in layers.


Covering the piece in tissue paper "The Frosted Layer Cake" almost looks good enough to eat!?


So After letting the glue dry, coat with another layer of glue then cover with sand.


Hey! What's in there? Could be Cookies and Milk? Let's go see.


Primed with a cheap "Auto Primer Spray Paint" Less the Four Dollars a can.


Finial finish the painting of the piece, so I started with Acrylic "Oxidized Brown" as the main color, I also use Burgundy, Orange and Yellow. I picture the layering of rock and desert colors one would see in photos and a like and just kind of mimic the look mixing the paint as i go on the piece so the colors all blend in nice the when this is dried I highlight it with a "Desert Tan".


Here you can see a 15mm Figure


Here you can see the two piece that are done placed together, I can't wait to get others done.


As you can see they look pretty good there together, like I mentioned I can't wait to put more together, I have the "Volcanic Steam Vents and Bubbling Mud Pool" piece covered in tissue, sand and primed, just waiting for the "Finial" paint.

These terrain pieces only cost a couple of dollars each, and I have a few more planed, a couple of each of the following, groups of natural stone bridges, another will be different plateaus, a couple of others that may have not come to mind as of yet but are in my head somewhere "Oh" and I'm thinking of a larger "Volcano" piece, so keep watching. When this project is finished I will post pictures of all the pieces on the table all at one time!

I really hope this inspired many of you out there to make builds similar to this and post them as well.